Making a Hypothesis Based on Data

Now that you have completed a graph or info-map, time to put together some ideas about what might have happened to your trees. Using the 5 w’s (who, what, when, where, and why) is a great way to start:

  • Who? Human versus natural. In your opinion, which features seem to be caused by humans? Which ones might have happened naturally? Explain why you think so.
  • What? Explain what you think happened to cause those human-caused or natural features.
  • When? Some stumps might be very old and some might be much younger. Plus, some of your stumps might have died as trees at around the same time. Group your stumps into ones that might have died at the same time and ones that might have died at different times.
  • Where? You know this one already, but it is very important to record anyway. Where did you find your stumps?
  • Why? Let’s think about those human-harmed trees. Why do you think humans harmed them?

Exploring Hexaflexagons

Prefer a printout? Here you go: Exploring Hexaflexagons

When making a hexaflexagon, take your time and enjoy the journey. There are all kinds of surprises waiting for you in every fold of this paper gizmo! For this exploration you will need:

  • a sheet of note paper (8.5 x 11) cut lengthwise into approximately 2 cm wide strips.
  • a ruler and a protractor
  • a glue stick or tape
  • a pencil and something with which to colour

Exploration 1: The V-Shape

We are going to do some experimenting!

  • Fold your strip of paper so that it makes a V-shape.
  • Next, hold your V up to a light source. A window or a lamp works well. Look carefully at the base of the V. What sort of shape do you notice? Use a pencil to carefully trace around the shape.
  • Measure the sides and the angles. What do you notice? Record your ideas.

There are four possible triangles you might have created: an isosceles triangle, an equilateral triangle, right angle triangle and a scalene triangle.

  • Which one did you create? How do you know?
  • Play around with your strips of paper. Can you make all four kinds of triangles? Write down what you accomplished and what your thoughts are. Is it even possible to make all four?

Use your protractor to measure the angle that sits inside the bottom of your V-shape.

  • Can you predict what sort of triangle you made just by measuring this angle? Make sure you test this idea several times and record what you notice.

Exploration 2: Folding Congruent Triangles

In order to make a hexaflexagon, you need to fold a line of congruent triangles. However, what kind of triangles are the best for this?

  • Try working with an isosceles, right-angle, equilateral, and scalene triangle. Fold your paper strip so that you end up with a line of triangles that are all the same shape and size (congruent). By the way, use a back-and-forth fold instead of a rolling fold.
  • Is it possible to fold all of them? Which ones seem to work best and why? Record what you notice.
  • When you unfold your stacks of folded triangles, what do you notice? Do some unfold in a particular way? What do you notice about the triangles that are next to one another?

Exploration 3: Creating Shapes From Lines of Triangles

You will likely have noticed that two triangles result in a pretty satisfying line of congruent triangles: the right-angle triangle and the equilateral triangle. Now we are going to play with these lines of triangles to see what kind of shapes we can make!

  • What kinds of shapes result from folding lines of right-angle triangles? What do they have in common?
  • What kinds of shapes result from folding lines of equilateral triangles? What do they have in common?

Teachers and parents: encourage students to test for different polygons and lines! Here are a few examples:

Exploration 4: Making The Hexagon

By now, you have probably figured out that you cannot make a hexagon shape from a line of congruent right-angle triangles. The equilateral triangle is the key!

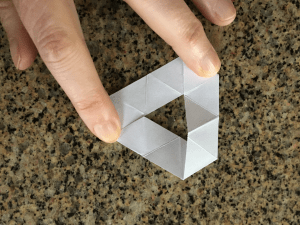
So: time make our hexaflexagon. To make a starter flexagon, you will need a line of 9 equilateral triangles in a row.

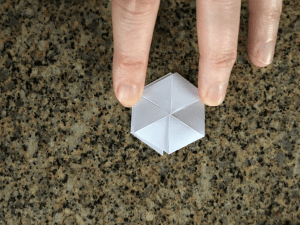
  • Play around and see if you can make a hexagon. You will notice 1 extra triangle left over. Fold this one over and glue or tape it down. You should have a nice stable hexagon with no major gaps.
  • Now you are going to make sure your hexagon is nice and flexible along all fold lines. Fold it along every line forward and back to make sure it is good and flexible.
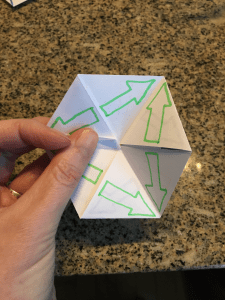
  • You should be ready to pinch your hexagon so that you make a three pointed star-shape. Gently open the top of the star. You will see…another hexagon! Pinch it to make another star shape and repeat:

Exploration 5: Playing with Designs

Grab some pencils or markers and start to colour your hexagon. Colour both sides a different colour. Add some extra designs if you like.

  • Pinch and open your hexagon now. What do you notice?
  • When you have coloured all possible surfaces of your hexagon, you can even unfold it to see what happens. Before you do it, make a prediction: what do you think it will look like?
  • Make more hexaflexagons! Create different kinds of designs! Play and experiment. What do you notice?

Finally:

  • Time to do some thinking! What do you think is going on here? Why does the hexaflexagon work the way it does?
  • Challenge yourself! Can you make a double hexaflexagon that shows six possible designs instead of three? What about a triple? Is it even possible? What happens when you try?
  • Can other shapes flex? Sure! Try out a quadriflexagon. Can you figure out how to make one?

If you just want the basic directions:

If you find the folding problematic, try a template:

Have fun everyone and good luck!

Grocery Store Investigation

We are going to investigate the way that grocery stores price their food! Specifically, we are going to investigate the pricing of fresh (perishable) food versus the pricing of non-perishable food. How are they priced? Why might they be priced differently?

Student Task Page: Grocery Store Investigation

Grocery Store Flyer Links: Choose 1 and investigate prices!

Investigating Weight or Mass: 

  • Grams and Kilograms (video by Math Mammoth) click here

Stump Stories: A Guided Inquiry

Before you begin, you may want to consider engaging with our Exploring with Math framework:

Stump Stories Week 1: 

Old stumps have interesting stories to tell and they have been waiting silently to tell them for a very long time. In part 1 of this inquiry, our job is to carefully observe the stumps in our neighbourhood parks and even our own school yard. What do we notice and wonder about these stumps as individuals and as a group?

  • Click here to watch the introduction video Stump Stories
  • Forest Task 1: locate stumps within a local park or wild space and write some initial observations of 1 or 2 interesting stumps based on your senses. Click here for an explanation of what it means to observe stumps with your senses.
  • Parents and teachers: Do you feel like you need some extra information about the stumps in our region to help guide your children/students in this inquiry? Click here for A Guide to Old Stumps

Stump Stories Week 2: 

Next, spend some time this week practicing using your body as a tool of measurement. This is very handy for forest observation as you won’t need to carry any extra tools with you.

  • Click here to watch the video Body Ruler
  • Practice 1 (Measuring using body units): Measuring Level 1
  • Practice 2 (Converting those measurements into metric units): Measuring Level 2
  • Forest Task 2: revisit the place where you found stumps. Use your body ruler to measure different aspects of each stump, including distances between various stumps.

Stump Stories Week 3: 

At this point, you have spent time collecting data on stumps. This week, you are going to get to know your stumps more deeply and make hypotheses about what happened to them. You might decide that some of them shared a similar fate and may be part of a larger story that happened at a particular time in our history. In order to perceive these broader patterns, we have some math work ahead of us!

  • Click here for a graphing exploration of tally mark data. How can we best represent our data to know the stories of our stumps?
  • Click here for making hypothesis. What might be the stories of our stumps? How do you know?

Stump Stories Week 4: 

  • Click here for an investigation of the recorded history of the Tri-Cities area.  You are looking for ideas about what could have happened to the big, old stumps a long time ago. You are also developing an understanding of the impact that colonization had on the land and the people who were here long before European settlers.

Stump Stories Week 5: 

Take a moment to look at the Tri-Cities history timeline you created, then take a look at these photos: Stump Pictures

Can you explain with certainty what had happened to these stumps? Can you specifically explain:

  • Why many of them have notches and cuts on them?
  • Why many of them have burn marks?
  • Why many of them are so huge?

Next, it is time to do a little math. You are going to determine approximately how long ago the trees were notched, cut, and burned. Timelines are number lines. If you put 2021 on your timeline, can you find the difference between years on your timeline and this year?

Stump Stories Week 6: 

  • The Elders are Watching. What does this book help us understand about the past? What does it help us consider about our present? Click here for a reading of this awesome book.
  • How do stumps support the life of the forest that came after? Check your infomaps. What does it show? If you can’t tell…time to head back to the forest! In your opinion, are the stumps really dead?
  • Next, time to discuss: What is our responsibility to the forest (including the old stumps) now?

Orange Shirt Day: Level 2 Math Tasks

This September 30 is Orange Shirt Day. Why do we recognize it? To honour reconciliation. To learn about the impact of residential schools. To show that every child matters. 

Before starting these math tasks, I highly recommend that you watch this video to understand the story that inspired Orange Shirt Day.

300 Sleeps: Orange Shirt Day Math Tasks

No matter what grade you are in, take some time to think about what it would have been like to be away from your family for 300 sleeps. In fact, let’s explore this number and see if we can discover something that might help us understand how hard that would have been:

  • Everyone: let’s pause quietly and silently for 300 seconds. How can you time yourself for 300 seconds? Timers use seconds, but they start to make minutes every time we reach a certain number of seconds. Work with a buddy and see if you can figure out how many minutes a timer might be able to make out of 300 seconds. Record your ideas in your math journal. When you have figured it out, sit with this buddy and feel what it is like to be still and quiet for 300 seconds.
  • In your math journal, write what it was like to sit for 300 seconds. What did it feel like? What did you do to make it easier?
  • Now let’s do some thinking about hours and minutes and seconds. In your math journal, record what you know! Hours in a day? Minutes in an hour? Seconds in a minute?
  • Now extend this! Can you figure out seconds in an hour? Seconds in a day? Minutes in a day? Explore these numbers. Show your work in your math journal.
  • Keep extending! Can you figure out how many seconds in 300 days?
  • Think: you had to sit for 300 seconds once. Imagine being lonely and missing your family for enough seconds to fill 300 days! Write about what that might have been like.


Recommended Resources for Extended Instruction at Home

All of the following links feature resources and tasks that are well-designed, but require more time and adult help:

Would You Rather: Well designed, visual problem tasks that allow students to choose and justify mathematically.

Jo Boaler’s You Cubed: These are challenging, engaging and well-explained tasks. Wonderful for small group or whole-class exploration.

SD43 Computation Tasks: Need to teach multiplication, division or fractions? These were created to build up a solid foundation of understanding through hands-on, minds-on tasks. They feature teaching of key vocabulary (division, in particular) and lead students through greater levels of abstraction (from concrete to standard algorithms).

Graham Fletcher’s Three Act Tasks: visual, accessible and engaging. Particularly great for whole class or small group discussion.

University of Waterloo’s Math Resources (grades 3-8): featuring excellent, challenging Problems of the Week. Please note that these are word problems and can be stressful, particularly for ELL and supported learners. We recommend adult guidance to keep enjoyment levels high.

What’s the Math?

An interesting way to start off a unit!  Watch the video and see if they can figure out the theme!

I recommend the following structure:

  1. Watch the video. Discuss possible themes
  2. Watch it again, this time pausing the video and allowing students to take notes on all they observe
  3. Discuss again.  Adjust theme predictions if necessary.
  4. Reveal the theme.  Flip the page over and write everything they know about the theme (examples, real-life connections, drawings, key math vocabulary)

The first one I’ve made is on Fractions: What’s the Math 1

Photocopy this thinking page for your students to use while you show the video: What is the math thinking page

Which One Doesn’t Belong

Here are some resources you might want to check out to get you started:

For images to use with your class: Which One Doesn’t Belong?

For Primary:

Try creating a four cell grid using masking tape on your carpet.  The class can create WODB’s using real objects.  Once they get used to the task, students can bring in objects from home to feature.

Remember: WODB’s are effective when differences are subtle.  All objects need to belong to the set, too.  The question is, how can an object be unique, but also belong to a set?

For Intermediate:

A critical thinking student response structure for you to try (and modify as you wish!): CRITICAL THINKING JOURNAL RESPONSES-1x2m60s

This is the page I created for the numeracy workshop, showing a sample WODB, the student response grid and a sample rubric developed by Monty Middle teachers:

CRITICAL THINKING JOURNAL RESPONSES for pro-d event-1ww70z9


Shape Shifters at Grade 1 and 2

This went well today.

Here is a printout that helps to frame thinking around the work we engaged in today: Primary shape exploration-rdblqc

Here is a printout for creating shape shifters: Hexagon-19fuvsq Hexagon-19fuvtg

But!  Before I launch into a lesson play-by-play, I feel I need to relate my angst over this….

Shape shifters (this funky, home-made tool made from 12 right angle triangles) has such potential to facilitate meaningful exploration of the way shapes move and transform, and to genuinely connect to story and culture across grade levels (K-7).   It’s one of the best ideas that I’ve ever had and I want it to work!!  So: I have been really really working on distilling all my many observations and connections down to some thing clear and, yes, elegant.  It’s taken YEARS of tinkering.  Plus, I’ve been trying to create those key questions (provocations) to set an inviting table for the kids. And I have been thinking hard about how things change and become more complex as kids get older.  Phew!  Thanks for that. Now onto what happened today…

I was invited into a grade 1/2 class today.  The previous week, students had already created their shape shifters and I had used my new die-cut to chop it into congruent right-angle triangles.  Today was the test drive.  I decided to focus on three key ideas:

  1. Shapes can transform into other shapes
  2. When you use your imagination, shapes can transform into analogous objects (i.e.: this triangle is like a hat!)
  3. Characters in Northwest Coast stories sometimes transform, too

To begin, I read Raven by Gerald McDermott.  What does Raven have to do with shapes? The students noticed lots of colourful shapes on Raven’s wings.  I explained that shapes transform and what it means to transform.  I asked them to listen to the story and notice when a transformation was occurring.

Next, we pulled out 2 shifters from the set.  It is important to start with a small number of shifters, especially for primary!   If you start with more than 2, it can be too tricky for kids.  We explored the following question:

How can these two shapes transform?

In the initial exploration, I wandered around and interacted with students, asking “How did you do that?  What does that look like to you?”

Next, I stopped them and popped up a picture of two shifters forming a triangle, asking:

How might you make this shape?

After making it, I pulled everyone down to the carpet to discuss this first shape using the following question:

What is special about this shape?

And then….

Does this shape have a name?

Next, I challenged them to transform it using their imaginations, thinking about what it reminds them of.

How does it transform in your imagination?

Before introducing the next challenge, I decided to go out on a limb and talk about shape movements (slides, rotations and flips).  This is not a part of the primary curriculum, but I felt that it might be helpful for some know what movements they might test to make new shapes.  I encouraged everyone to hold up their fingers in a triangle shape, pulling them apart to show a slide, turning to rotate and flipping one hand to show, well, flipping (all with sound effects, of course).

I popped up the next picture and we repeated the whole process from building to discussing.  There were gasps when they realized we had just made a three-sided shape transform into a 4-sided shape.  And then we ran out of time!

Not a perfect lesson, but I felt like I’d accomplished something nevertheless. Here are my wishes and take-aways:

  1. I wish I had framed the Raven story differently. It would have been fun if I had let them know that there was math hiding in this story and asked them to carefully listen for the math.  You could do this with older students, too.
  2. It really was challenging to transform just 2 right angle triangles!  It makes me wonder if the K-2 level should just create an equilateral triangle tool split into 2 right angle triangles.  Once they get good at working with 2, they can partner up and see what else they can make.  Not a bad idea, really.  This allows the tool to grow and remain fresh as students get older.  A definite plus and a potential solution to a problem that has worried me.
  3. Teaching younger students about shape movements seems to be helpful.  I love that they seem really useful and give kids options to deliberately test.  So much better than the superficial nod they get in intermediate.
  4. The two layers of transformations (physical and imaginative) seem to be really compelling for young students.  This will allow them to connect to story later, using their shifters to represent characters, objects and ideas.

We’ll continue to play with this after the break!

Want a bit more background on this project?  Click here to read the 2017 Vector Magazine article I wrote on the subject.


Skip to toolbar