Array Counting Samples for Grade 3

Step 1: Select and Count

  • Let’s say I chose chocolate chips (don’t worry, I didn’t hold them long enough that they melted).
  • I counted them twice and am certain that I have 37 chips.

Step 2: Time for me to build some arrays!

  1. First, I need to see if I can build an array using 37 chips.
  2. After playing around with them, I’m pretty sure that the only one I can build is a 1 x 37 array.
  3. That’s pretty boring, so I am going to adjust my group by eating one chocolate chip. Now I have 36 chips and I can make a bunch of arrays. I only need to make two, so here are my favourites:

Step 3: Next, I need to represent them using pictures, words and equations. For my equations, I need to try to use repeated addition and multiplication:

Cover UP Addition and Subtraction

To play this game you will need:

  • a partner
  • coins (you can use paper ones if you like: click here)
  • a gameboard printout!

You can use these gameboard to create different practice games! You customize it to suit your needs. Instructions are  on the printout:

Want to see a sample gameboard with the grid filled in? Cover UP subtraction game demo

Number Line Subtraction Videos

We created these videos to help our late primary students practice a number line approach to subtraction. You’ll notice that the first 3 videos in the series do not mention the word subtraction. Don’t worry. We’re slowly building the foundation and will be bringing more abstract reasoning as we go.

Video 1: Chewy and BB8 find the difference

Video 2: Chewy and BB8 explore what is missing

Video 3: Chewy and BB8 use empty number lines to find the difference

Video 4: Chewy and BB8 explore what is left over

This video on subtraction stacking methods was developed for parents to help them make sense of the different options, but is helpful for teachers too.

King of the Castle

king of the castle level 1–practice bridging to ten by capturing castles. Level one is a good starter to see whether or not your students know their “making ten” facts.

King of the castle level 2–practice bridging to twenty. Extends a child’s application of “making ten” facts.

King of the castle level 3 page 1–practice bridging to the friendly tens (multiples of ten). Continues to extend a child’s application of “making ten” facts.

King of the castle level 3 page 2–extra page if a group chooses the challenge extension.

King of the castle level 3 page 3–extra page for challenge extension (if working in a group of 3)

Measuring Tips for Forest Observation

Before entering the forest, make sure your students feel comfortable with the following estimating and measuring techniques. We recommend you practice one skillset at a time outside on the playground or in your back yard. These all involve getting to know your body measurements as a referent for estimation in a natural setting where rulers can be awkward and ineffective.

Film: Click here for Body Ruler!

Practice activities to get you started:

  • Practicing body measuring (non-standard units): Level 1
  • Converting body units to metric: Level 2

Body Ruler Explained:

Fingertip Measuring: This is great for measuring small spaces or objects.

  • Level 1: Place the index fingers from both hands together and “walk” one over the other. Count how many steps you take.
  • Level 2: Measure the width of your index fingertip to the nearest mm. Walk one finger over the other. Add or multiply to find the total number of mm.
  • Level 3: Convert the mm to cm.

Handspan Measuring: This is good for spaces that are too large for using fingertips, but not so large as to need a full arm-span.

  • Level 1: Stretch the fingers of both hands out as wide as they will go. “Walk” one hand over the other, from thumb to pinky tip. Count how many steps you take.
  • Level 2: Measure the span of your hand from thumb to pinky tip to the nearest cm. Walk one hand over the other. Add or multiply to find the total number of cm.
  • Level 3: Convert cm to mm or meters depending on what makes the most sense.

Arm-Span Measuring: This is great for spaces that are too large for hand-spans. I also call this a “hug meter”. Great for measuring the circumference of large tree trunks.

  • Level 1: Stretch your arms open wide at the start of your space. Anchor the fingers that are pointing into the space and move the other hand towards them. Now, the other hand will switch places and become the anchor. The other hand will reach out for another arm-span. Keep going until you have measured the whole space. Count how many arm-spans it took.
  • Level 2: Measure the span of your arms to the nearest cm. Use your arms to measure a space as in level 1. Add or multiply to figure out the total number of cm.
  • Level 3: Convert cm to meters or mm depending on what makes sense.

Foot Measuring: This is great for measuring the forest floor. You might choose this for smaller forest floor spaces.

  • Level 1: Walk carefully placing the heel of one foot against the toe of the other. Count how many footsteps you take.
  • Level 2: Measure the length of your foot to the nearest cm. Measure a space as in level 1. Add or multiply to determine total number of cm.
  • Level 3: Convert cm to meters or mm depending on what makes sense.

Stride Measuring: This is good for measuring the distance between objects if they are far apart. It is less accurate than foot measuring, but so long as you get used to a regular stride, then it will still be a reasonable estimate of distance.

Before you start, take some time walking at your regular pace. Get a good feel for it. Try to be consistent.

  • Level 1: Measure the distance between objects by counting how many steps you take.
  • Level 2: Using a long measuring tape, measure the centimeters you travel in one stride. Place the measuring tape on the ground, place both feet at the beginning, and take a normal step. Do this a few times to see if you land in about the same spot. Now measure the distance between objects and add or multiply to find the total number of cm.
  • Level 3: Place the measuring tape on the ground. Walk using your normal stride, counting off around 10 steps. See where your landed on the tape. Divide that length by 10 to find an average stride length. Convert to meters if that makes more sense.


Helping Our Community: Make a Graph

Before you make a graph, you need to have something to count or measure. Here are some possible examples:

  • picking up litter
  • walking or biking to school
  • collecting food for the foodbank
  • earning money to help your community

It might take you a lot of time to collect data on the way you decided to help your community.

In order to create an interesting graph, you also need to create some categories that help people understand what you did a little bit more. For example:

  • If you picked up litter, you might want to count what types of litter you picked up
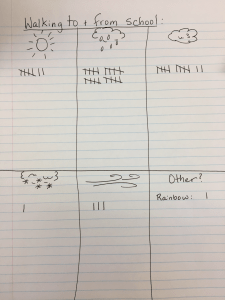
  • If you walked or biked to school, you might want to keep track of the weather to show how many days you walked when it was rainy, windy, cloudy, sunny or snowy
  • If you collected food for the foodbank, you might want to count the different types of food you collected
  • If you earned money, you might want to count the types of chores that you did

Say you decided to walk or bike to school. Your data collection page might look like this:

When you are done collecting data, you can turn it into a bar graph or a pictograph.

Videos for Graphing Beginners:

Click here for a Brain Pop video explaining how to make a bar graph.

Click here for a Brain Pop video explaining how to make a pictograph.

Videos for Experienced Graphers:

Click here for a Khan Academy video explaining how to make picture and bar graphs.


Skip to toolbar